Shower valve replacement

Plumbing Forums

Help Support Plumbing Forums:

This site may earn a commission from merchant affiliate links, including eBay, Amazon, and others.

Davva

Member
Joined
Jan 28, 2012
Messages
5
Reaction score
0
Location
,
Hi all.

Sometime in the near future I plan to replace the shower valve in the downstairs shower so I thought I would run my plan by you all and get your input.

Here is a picture of what it looks like right now.
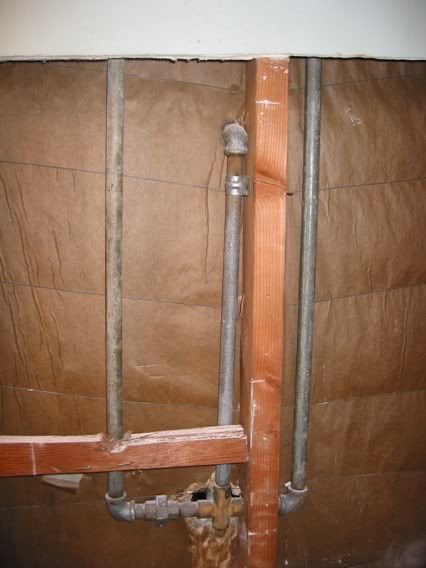
pipesred.jpg


I'm a novice when it comes to plumbing so any advice would be greatly appreciated.
I replaced all the sprinklers in the front yard recently but that's about my only experience.

My plan is this:

1. Cut out the studs for access.
2. Cut the pipes on the left and right about a foot up from the bottom.
3. Thread the pipes
4. Fit unions left and right then run pipes down to the new valve.

It seems pretty straight forward to me but that's probably because I don't really know what I'm doing.

I do have a couple of questions, however.

1. Is it better to bend the pipes or just use 90's as in the pic?
2. Should I use tape or dope or both on the joints?
3. Anything else I should be aware of?

Thanks in advance

Davva
 
My first question is why are you replacing the valve? From what I can see of it it appears to be a Moen shower valve. If is leaking all that is needed to make a repair is a new stem which you can get for free from Moen. As far as replacing it there is no reason to cut the studs. As far as cutting and threading the galvanized pipe in place it would be much easier to remove the valve a use the existing threads on the pipe or ells. You can't bend the galvanized you must use fittings. You can use tape or pipe dope on the threads. I have always done both.

John

Thanks for the reply.

I'm replacing the valve because it's leaking. A lot. I tried putting new seals in but the holes that the seals fit into are corroded and broken so the seals don't seal. The guy in Ace Hardware told me the valve would have to be replaced.

The rough-in valves I have seen all seem to be wider than the one that's there so that's why I was thinking I wouldn't be able to use the existing pipe with the new valve. (which I haven't actually got yet)

I cant see how I can get the tools in there without cutting the studs out. Especially the joint to the right of the valve. That is completely covered by the stud so I figured the stud would have to come out.
 
Step 1: Unscrew the showerhead and shower arm from the other side of the wall. The shower arm will very likely break of in the 90, the easiest way to fix that would be to replace the 90. While you are over there, remove the trim and the cartridge from the valve.

Step 2: Take the strap off of the shower riser and unthread the riser from the top of the valve.

Step 3: Take apart the union on the left side of your picture. Remove the nipple from the valve between the union and the valve.

Step 4: Unthread the valve off of the nipple on the right side of the picture. This might be the most difficult part.

Step 5: Pul the right hand water pipe to the right to get access to that pipe nipple, and change it out for one of the correct size for the new valve.

Step 6: Reverse the order to reassemble, changing out the nipple between the union and the new valve to one of the correct size.

That was pretty much how I envisioned things but, as I said to johnjh20, the rough-in valves I have seen are wider than the one I will be taking out so I'm not sure that 1. It will fit under the stud and 2. I will still be able to use the existing pipe/nipples.

That's why I was thinking of cutting the pipes and moving the unions.
 
A Moen PosiTemp IPS valve doesn't take up all that much room, I am fairly certain from looking at the picture that the worst you will have to do will be to change out the nipples that thread into the valve body.
 

Latest posts

Back
Top